• Welcome to the Fantasy Writing Forums. Register Now to join us!

Aluminum Swordmaking

Konjurer

Dreamer
No offense, Kevlar, but this is akin to saying that aluminum baseball bats don't qualify as weapons. If someone was pointing one of Sheila's swords at me in anger, I'd run away faster than Sir Robin from the Killer Rabbit of Caerbannog . But that's just me.

I have to thank you for making a totally inane comparison between swords and baseball bats and then following it up with the obscure, yet witty Monty Python reference. Nicely done.
 

Konjurer

Dreamer
And all this time I thought I was just really depressed. I suppose that I'll have to quit eating all those empty beer cans. Y'know, come to think of it, Legendary Sidekick did warn me about that once...


Wow...you have a really weird sense of humor. Like a bizarre mix of Woody Allen and Douglas Adams.
 

Kevlar

Troubadour
Everything I say is being misunderstood all over the forum... probably my fault.

What I meant was not that these aluminum swords couldn't be used as real weapons, (and likewise I wouldn't stick around if someone was going on a rampage with one) but that the use of aluminum automatically implies that they are not intended for serious use as a weapon. Could they find use as one? Certainly, especially in this modern world where no one carries around anything to specifically counter it. Make no mistake, I was not saying they aren't weapons. I was mostly suggesting that labelling them as art could get them around a lot of restrictions.

Looking forward to the second part.
 

Reaver

Staff
Moderator
Everything I say is being misunderstood all over the forum... probably my fault.

What I meant was not that these aluminum swords couldn't be used as real weapons, (and likewise I wouldn't stick around if someone was going on a rampage with one) but that the use of aluminum automatically implies that they are not intended for serious use as a weapon. Could they find use as one? Certainly, especially in this modern world where no one carries around anything to specifically counter it. Make no mistake, I was not saying they aren't weapons. I was mostly suggesting that labelling them as art could get them around a lot of restrictions.

Looking forward to the second part.

I stand corrected, sir. Thank you for clarifying that. You make a very good point.
 

Sheilawisz

Queen of Titania
Moderator
Aluminum Swordmaking Guide

Page 2- What you need

Well, now that you know the hazards that are involved and you are ready to go ahead, Page 2 will tell you everything that you need to get started in Aluminum Swordmaking:

1- First, you have to find a metals supplier (what I call metals shop) close to your place- these are the businesses that sell steel, iron, copper, bronze, aluminum and other metals for the building industry and so on. When you call them you have to ask especially for Aluminum 6061-T6 which is after all the most common Aluminum alloy. You can also ask for 7075-T6 which is a little more difficult to find, but it's even better to make swords with.

They may ask you what exactly you need it for- this is a funny moment because if you say that you want to make swords they will think that you are nuts, so just tell them that you want to reinforce a dog house or something like that. It can also happen that they have no idea about Aluminum alloy codes and they just sell it as Aluminum: This is not a problem, because 6061-T6 is the most common alloy and you will most likely be getting that one.

Now, you need to ask for an Aluminum bar (or slab? not sure what you call them in English) precisely 2 inches wide and 3/16" thick- That is what I work with, and even though other Aluminum Swordmakers use 4/16" I feel that just three sixteenths is better because it will make a lighter and faster blade. The little problem here is that the metals suppliers usually will sell you an entire 6 meter long slab and not just what you need, but don't worry: They will just send it to your place and then you will be able to easily cut it to have six slabs of one meter each.

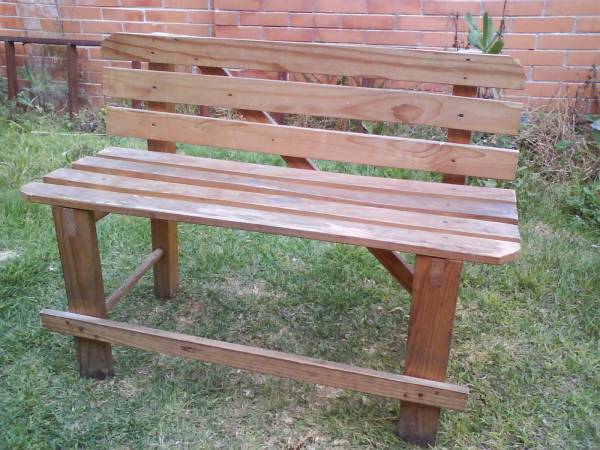
2- You need three basic tools to start your Aluminum Swordmaking, and the first is a little wooden bench like the one I work with, picture here:

Fotograf_a_2309.jpg


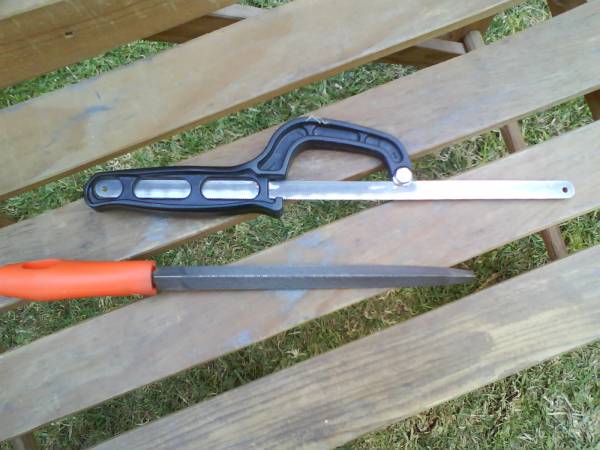
I work on my wooden bench in my back garden, if you cannot find a little bench like this then maybe you could use a table or something else. The other tools that you need are a one-hand hacksaw and a heavy triangle file, picture here:

Fotograf_a_2310.jpg


3- You will need as well a plastic 30cm ruler and a ball-point pen, you will see why!! Now that you have all of these (and your gloves, goggles and respiratory protection!!) You are ready to start your Aluminum Swordmaking.

Page 3 coming tomorrow!!
 

Reaver

Staff
Moderator
Aluminum Swordmaking Guide

They may ask you what exactly you need it for- this is a funny moment because if you say that you want to make swords they will think that you are nuts, so just tell them that you want to reinforce a dog house or something like that.
*Note to self: DO NOT go to the metal supplies shop dressed in your scalemail (again).*

Now, you need to ask for an Aluminum bar (or slab? not sure what you call them in English)...
Either one is okay...a little known fact here: There's actually a bar close where I used to live called "The Slab".


But seriously...thanks for the informative guide thus far!
 

Sheilawisz

Queen of Titania
Moderator
Aluminum Swordmaking Guide

Page 3- Start creating your Sword

You have now everything that you need to start, and first of all, let me tell you that hard work is coming. Working by hand on metals may seem like a bad idea because power tools are available, but first, the specific tool that you would need for this is very dangerous. Second, working by hand will create a stronger link between you and the sword, and in the end you shall feel very proud of your blades.

1- Get creative!! Drawing your sword: You have now an Aluminum slab about one meter long, and the first step now is to use your imagination and create the design of your sword. I suggest a design created with straight lines only because curved lines are way more difficult to cut- another important point here is that you should create a design that minimizes the amount of metal that you will have to remove to finally create a sword from a slab.

Use the plastic ruler and the ball-point pen to create the drawing of your entire sword. The lines that you draw on the Aluminum will be slowly erased as you work, so you will have to draw them again later in the process. Keep in mind that the finished cut (already filed down and everything) will not run exactly on these lines, but about one millimiter beside them.

2- Your sword is already inside the slab:You simply have to remove the metal that is encasing it, so now take your hacksaw and start cutting!! As soon as you start hacksawing you will discover that this metal is not a joke, and if you have never hacksawed anything before, you will soon feel discouraged at the idea of cutting so much metal to finish your sword. You need to take it easy- Creating straight and neat cuts takes practice and patience.

Hacksawing Aluminum is not a matter of strength, it's all about skills and practice. The amount of metal that you will have to file away later will always depend on the quality of your cuts, so you can expect that your first sword will require a lot more of work than the blades that you will create when you are more experienced- Just be patient, be very careful and with practice it will become much easier.

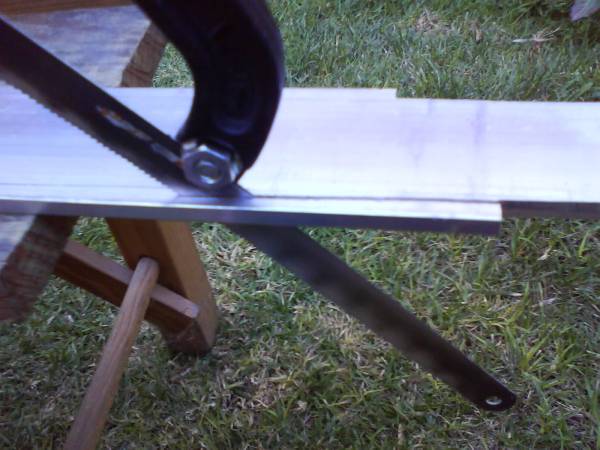
This picture shows you the kind of cuts that you need to perform:

Fotograf_a_2311.jpg


3- After you cut a long section like this, you need to remove it completely and then start to work with your File to remove the remaining metal and create a neat finish. You need to work by parts, it's not about cutting everything first and filing later: cut and then file, cut and then file and so on. Creating an entire sword from a slab usually takes me an entire month of hard work and patience, but believe me, the joy and the pride that you feel when you finally have your sword in your hand and wield it around is worth every second of your hard work!!

Your first sword may not be a perfect work, but that's alright. You will also see that the metal looks grey and dull so far: We shall fix that later. The next step of Aluminum Swordmaking is about the edges...

Page 4 coming tomorrow!!
 

Reaver

Staff
Moderator
Excellent guide, Sheila! Your positive encouragements throughout this informative post are very inspiring!:smile:
 

Sheilawisz

Queen of Titania
Moderator
Thank you, Reaver!! =) Well, I did feel very discouraged when I created my first sword, and it was even worse with everyone (especially my family) trying to discourage me too, saying that it was impossible- I really wanted to do this so I had patience and I practiced, which is why I want to encourage the readers of my guide to do exactly the same.
 
Last edited:

Reaver

Staff
Moderator
You're welcome,Sheila! I'd say that all that patience and hard work paid off! Your swords are exquisitely crafted and beautiful. I can't wait to see the pictures of the others you've made!:)
 

Sheilawisz

Queen of Titania
Moderator
Aluminum Swordmaking Guide

Page 4- Working on the Edges

You have now an unfinished Aluminum sword!! You can already play with it, but more work is necessary if you actually want to have fun cutting targets or maybe using your sword for theatrical plays. Your sword has four edges now, two in the left side of the blade and two more in the right, so now you have two options:

1- Safe Edges: If you just want your sword to look great, and sometimes play with it having contact with another Aluminum blade, you need to create safe edges because the sharp ones can get damaged easily- First, take your File again and place it in contact with your blade with an angle of 45° precisely.

Do not move the file up and down!!

To create a neat finish on the edges, you need to move your file from one side to the other all across the length of your blade-You have to be careful to keep the file in exactly the same angle, and soon you will see how a different edge starts appearing as you keep moving the file from one side to the other.

Work by parts, first on the lower section of the blade and then the upper part...

Keep filing like this until you have edges around 2 millimiters thick, or a little more if you like, and then give them a better finish using a high grade sandpaper.

2- Sharp Edges: First, keep in mind that your sword will not be really sharp!! Actually you would need to work-harden the edges, and I have no idea how to do that- However, you can create edges sharp enough to slash soft targets and a tip sharp enough to easily stab pumpkins and other similar things.

Follow the instructions for Safe Edges with the difference that you will keep filing until the 45° angles touch each other- this can take loads of time and hard work, just be patient!! Sharpening the tip of your sword means another set of complications, and you have to be particularly careful with that part. When you have finished, use the sandpaper on the edges and your sword will look great.

The metal is looking very grey, dirty and dull after all this work- Polishing your sword is coming next =)

Page 5 coming tomorrow!!
 
Last edited:

Reaver

Staff
Moderator
Thanks, Sheila! This is yet another helpful, insightful page in an already very informative guide. Nicely done! :happy:
 

Sheilawisz

Queen of Titania
Moderator
Aluminum Swordmaking Guide

Page 5- Finishing your Sword

This is the last page of my Guide, where you can finally give the last details to your sword and enjoy it to the fullest!! You will really love the sword that you have made with your own hands, so I am sure that now you want to make it look and feel as best as you can to show it off and everything =)

1- Polishing your Sword: There are special polishing substances to work on metals, but you don't really need them: Just go to the supermarket and buy cheap and common toothpaste. That is excellent to polish metals too, and to work with it on your sword, you need to wear your gloves again and get an old piece of fabric or something like that.

The first step is to simply wash your sword with soap and water =)

Apply toothpaste and water to your sword and then start scrubbing it with the fabric- You have to work by parts again, frequently adding more toothpaste and water as you work. You will immediately realize that a black/grey liquid starts forming- poison danger again, do not let this liquid to come into contact with your skin!!

Polishing Aluminum is fast and you will see the first results after a few minutes of work- Your sword will really start to look great!! Keep polishing for as long as you want, or until you can see a clear reflection of images on the blade. You will realize now that Aluminum looks more like silver than steel, absolutely a beautiful metal =)

Aluminum is also very resistant to oxidation and corrosion, meaning that your sword will retain its great looks for much longer and it shall require far less maintenance than a sword made of steel or bronze.

2- The Grip: To finish the Grip of your Sword, you can add a layer of leather or just fabric of any colour that you like- I have used violet on my swords =)

I wish that you have enjoyed my Aluminum Swordmaking Guide, and if you actually decide to follow my instructions and make swords of your own, I wish that you shall have a happy Aluminum Swordmaking!!

End of the Sheilawisz Aluminum Swordmaking Guide
 
Last edited:

Reaver

Staff
Moderator
Thank you for this entire Aluminum Swordmaking Guide, Sheila! It's very helpful, informative and encouraging!:)

Hopefully I'll be able to find enough free time to try my hand at this very soon! Great job!
 

Sheilawisz

Queen of Titania
Moderator
I am very happy that I have been able to share this knowledge here in Mythic Scribes!! Good luck Reaver, when you have produced your first sword it would be great if you share pictures of your work in this thread =) Aluminum 2024-T3 is another good option to make swords with, but I did not mention it before because it is more vulnerable to corrosion than 6061-T6.

7075-T6 is considerably more expensive than other alloys (or so I heard) but it has a surprising Brinell hardness of 150 which means that it is harder than mild steel, so if you want your sword to be very strong, get that alloy!!

So, anyone else apart from Reaver that actually wants to try Aluminum Swordmaking?? Any comments about the Guide are highly appreciated =)
 
Last edited:

SeverinR

Vala
Aluminum Swordmaking Guide

*Note to self: DO NOT go to the metal supplies shop dressed in your scalemail (again).*
Scale maille? Pictures? or was it just talk?

I have chain maille items.

The ill affects of working with metal fumes= metal fume fever. Most metals cause, galvanized metal is really bad.
Usually caused by heating metal or breathing metal dust.

Great looking swords, any pics with the grip on them?
 
Top